How to Create VHS Glitch Art in Adobe Photoshop
![](https://thephotographicangle.com/wp-content/uploads/2023/10/image-10.png)
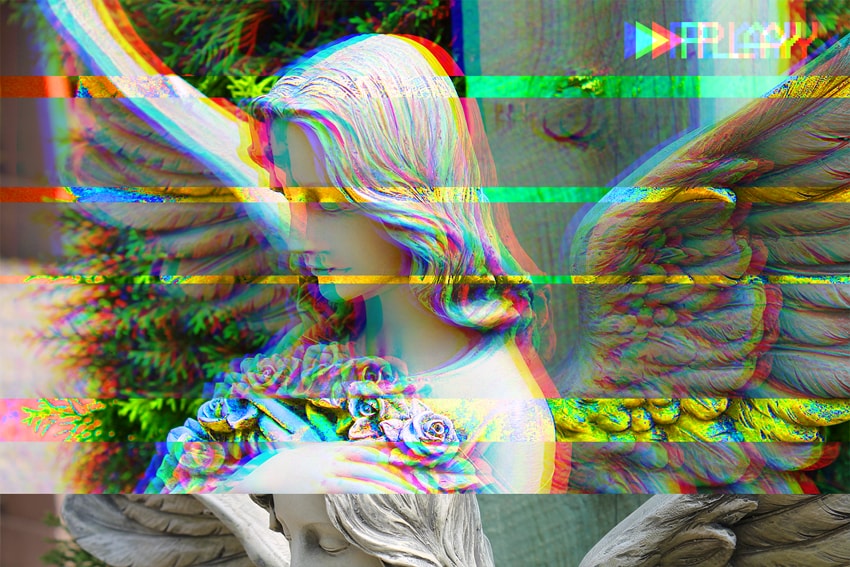
What You’ll Be Creating
Learn how to create a glitch effect in Photoshop in this tutorial.
Tutorial Assets
- Any photo you want to use for this manipulation. You can find some free photos on Unsplash and Pixabay or buy high-quality photos on PhotoDune. I chose this photo from Pixabay.
- Free font: VCR-OSD-Mono font.
1. Prepare the Document
Step 1
Use Control-N to create a new document and use the following settings: 1500 x 1000 px; 300 dpi.
![Creation of document VHS effect Photoshop](https://cms-assets.tutsplus.com/uploads/users/1381/posts/26562/image/1%20Final%20s.jpg)
Step 2
Go to File > Place and put your image inside the document.
![Adding your image](https://cms-assets.tutsplus.com/uploads/users/1381/posts/26562/image/2%20Final%20s.jpg)
Step 3
Resize your image to the borders of the document and click Enter.
![Resizing of image](https://cms-assets.tutsplus.com/uploads/users/1381/posts/26562/image/03%20final%20S%20S)-min-min.jpg)
Step 4
Click T and create a new text layer in the top right corner.
![Creation of text layer](https://cms-assets.tutsplus.com/uploads/users/1381/posts/26562/image/04%2001-min.jpg)
Step 5
Click U and select Polygon Tool, and create a triangle shape. Then place it as shown in the image below:
![Creation of play icon](https://cms-assets.tutsplus.com/uploads/users/1381/posts/26562/image/05%20(01)-min.jpg)
Step 6
Select your layers by holding Shift and then Right Click > Merge Layers.
![Merging all layer to one](https://cms-assets.tutsplus.com/uploads/users/1381/posts/26562/image/6%20Final%20s.jpg)
Step 7
Now Right Click on the layer and then Convert to Smart Object.
![Creation of Smart Object](https://cms-assets.tutsplus.com/uploads/users/1381/posts/26562/image/7%20Final%20s.jpg)
Step 8
Create four duplicates of your smart object using Right Click > Duplicate.
![Creation of duplicates of layers](https://cms-assets.tutsplus.com/uploads/users/1381/posts/26562/image/8%20final%20s.jpg)
2. Create the Effects
Step 1
Make all layers except the first two invisible, and then Double Click on the second layer and Uncheck the Green and Blue channels.
![](https://cms-assets.tutsplus.com/uploads/users/1381/posts/26562/image/9%20final%20s-min%20(1)%202.jpg)
Step 2
Click V and Move your second layer, holding Shift, 30 px to the right.
![Creation of first color shift effect](https://cms-assets.tutsplus.com/uploads/users/1381/posts/26562/image/10%20final%20s-min.jpg)
Step 3
Make the third layer visible and Uncheck the Red and Green channels the same way as listed above. Then move it, holding Shift, 20 px to the left.
![Creation of second color shift effect](https://cms-assets.tutsplus.com/uploads/users/1381/posts/26562/image/11%20final%20s-min.jpg)
Step 4
Make the fourth layer visible, and go to Layer > New Adjustments Layer > Hue/Saturation.
![Creation of color distortion effect](https://cms-assets.tutsplus.com/uploads/users/1381/posts/26562/image/13%20final%20s-min.jpg)
Step 5
Double Click on the adjustments layer and change the Saturation setting to +100.
![Creation of color distortion effect](https://cms-assets.tutsplus.com/uploads/users/1381/posts/26562/image/14%20final%20S%20S%202.jpg)
As you can see, the saturation effect is applied on the entire image, but we need to crop it to only a few areas.
![](https://cms-assets.tutsplus.com/uploads/users/1381/posts/26562/image/14-min.jpg)
Step 6
Right Click on the “Hue/Saturation” layer and select Clipping Mask, so this effect will be applied only on the necessary layer.
![Applying color distortion to only one layer](https://cms-assets.tutsplus.com/uploads/users/1381/posts/26562/image/15%20final%20s.jpg)
Step 7
Now Add Mask to the fourth layer.
![Applying color distortion to only one layer](https://cms-assets.tutsplus.com/uploads/users/1381/posts/26562/image/16%20final%20S%20S%203.jpg)
Step 8
Alt-Left Click to open the mask layer. Fill it with black.
![Applying color distortion to only one layer](https://cms-assets.tutsplus.com/uploads/users/1381/posts/26562/image/17%20final%20S%20S%202.jpg)
Step 9
Click M and select the areas on the mask where you want to reveal the effect, and Fill it with white.
![Creation of mask for color distortion effect](https://cms-assets.tutsplus.com/uploads/users/1381/posts/26562/image/18%20final%20s.jpg)
Now the saturation effect is applied only on a few areas:
![](https://cms-assets.tutsplus.com/uploads/users/1381/posts/26562/image/19%20final%20s-min.jpg)
Step 10
Add a Mask to the fifth layer and Fill it with black. Then create a big white area a little above the center.
![Creation of mask for mirror effect](https://cms-assets.tutsplus.com/uploads/users/1381/posts/26562/image/20%20final%20s.jpg)
Step 11
Move this layer 600 px down, while holding Shift.
![Creation of mirror effect](https://cms-assets.tutsplus.com/uploads/users/1381/posts/26562/image/21%20final%20s-min.jpg)
Step 12
Go to Filter > Blur > Motion Blur and use the following settings: Angle: 15°; Distance: 15.
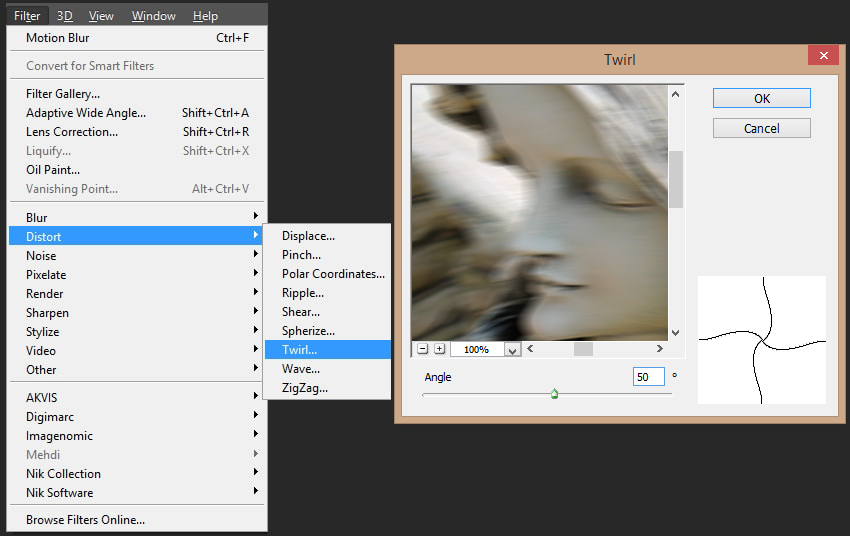
![Creation of mirror effect](https://cms-assets.tutsplus.com/uploads/users/1381/posts/26562/image/22%20final%20s-min%202.jpg)
Step 13
Let’s add some more distortion to the image. Go to Filter > Distortion > Twirl and use the following settings: Angle: 50°.
![Creation of mirror effect](https://cms-assets.tutsplus.com/uploads/users/1381/posts/26562/image/23%20final%20s-min%202.jpg)
Step 14
Right Click on the Hue/Saturation layer and select Duplicate. Then put it above the fifth layer and Create A Clipping Mask.
![Creation of mirror effect](https://cms-assets.tutsplus.com/uploads/users/1381/posts/26562/image/24%20final%20%20s%20ss.jpg)
This is how our image will look after all the manipulations listed above:
![](https://cms-assets.tutsplus.com/uploads/users/1381/posts/26562/image/25%20final%20s-min.jpg)
3. Create the VHS Textures
Step 1
Create a new layer using Shift-Control-N, and Fill it with white.
![Creation of First TV texture](https://cms-assets.tutsplus.com/uploads/users/1381/posts/26562/image/26%20final%20s.jpg)
Step 2
Go to Filter > Filter Gallery > Sketch and select Halftone Pattern. Use the following settings: Size: 2; Contrast: 2.
![Creation of First TV texture](https://cms-assets.tutsplus.com/uploads/users/1381/posts/26562/image/27%20final%20s-min%202.jpg)
Step 3
Double Сlick on the layer and set the following settings: Blending Mode: Overlay; Opacity: 25%. Uncheck the Red and Blue channels.
![Creation of First TV texture](https://cms-assets.tutsplus.com/uploads/users/1381/posts/26562/image/28%20final%20s-min%202.jpg)
Step 4
Duplicate the texture layer and then use Control-T while holding Shift to rotate it 90° and resize to the borders.
![Creation of second TV texture](https://cms-assets.tutsplus.com/uploads/users/1381/posts/26562/image/29%20final%20s-min%20(1).jpg)
Step 5
Double Click on the layer and set the following settings: Blending Mode: Normal; Opacity: 15%. Uncheck the Green and Blue color channels.
![Creation of second TV texture](https://cms-assets.tutsplus.com/uploads/users/1381/posts/26562/image/30%20final%20s-min%202.jpg)
Step 6
Click U and select the Rectangle Tool. Then create a shape with the following settings: Width: 1800 px; Height: 120.
![Creation of noise stripe](https://cms-assets.tutsplus.com/uploads/users/1381/posts/26562/image/31%20final%20s-min.jpg)
Step 7
Right Click on the rectangle layer and select Rasterize Layer.
![Creation of noise stripe](https://cms-assets.tutsplus.com/uploads/users/1381/posts/26562/image/32%20final%20s%202-min.jpg)
Step 8
Go to Filter > Noise > Add Noise and use the following settings: Amount: 400%; Distribution: Uniform; Monochromatic.
![Creation of noise stripe](https://cms-assets.tutsplus.com/uploads/users/1381/posts/26562/image/33%20final%20s-min%202.jpg)
Step 9
Go to Filter > Blur > Motion Blur and use the following settings: Angle: 0°; Distance: 20 px.
![Creation of noise stripe](https://cms-assets.tutsplus.com/uploads/users/1381/posts/26562/image/34%20final%20s-min%202.jpg)
Step 10
Go to Image > Adjustments > Brightness/Contrast and use the following settings: Brightness: 150; Contrast: 100.
![Creation of noise stripe](https://cms-assets.tutsplus.com/uploads/users/1381/posts/26562/image/35%20final%20s-min%20S%20S.jpg)
Step 11
Use Control-I on the rectangle layer to invert the colors of the noise texture, and then change the Blending Mode to Color Dodge.
![Creation of noise stripe](https://cms-assets.tutsplus.com/uploads/users/1381/posts/26562/image/36%20%20final%20s%202-min%20FINAL-min.jpg)
Step 12
Duplicate your noise stripe layer a few times and move it, holding Shift, to different places.
![Adding more noise stripes](https://cms-assets.tutsplus.com/uploads/users/1381/posts/26562/image/37%20final%20s%202-min.jpg)
Step 13
Create a new layer using Shift-Control-N, and Fill it with black.
![Creation of confetti texture](https://cms-assets.tutsplus.com/uploads/users/1381/posts/26562/image/38%20final%20s.jpg)
Step 14
Go to Filter > Noise > Add Noise and use the following settings: Amount: 400%; Distribution: Uniform; Monochromatic.
![Creation of confetti texture](https://cms-assets.tutsplus.com/uploads/users/1381/posts/26562/image/33%20final%20s-min%202%2056.jpg)
Step 15
Now add the Patchwork effect using Filter > Filter Gallery > Patchwork and use the following settings: Square Size: 0; Relief: 0.
![Creation of confetti texture](https://cms-assets.tutsplus.com/uploads/users/1381/posts/26562/image/39%20final%20s-min%20SS-min.jpg)
Step 16
Go to Image > Adjustments, select Threshold, and set it to 240.
![Creation of confetti texture](https://cms-assets.tutsplus.com/uploads/users/1381/posts/26562/image/40%20final%20s-min%20Fin.jpg)
Step 17
Double Click on the layer and use the following settings: Blending Mode: Screen; Opacity: 100%. Uncheck the Red and Blue channels.
![Creation of confetti texture](https://cms-assets.tutsplus.com/uploads/users/1381/posts/26562/image/41%20final%20s-min%20fin.jpg)
Step 18
Now you will need to Duplicate the layer, Check the Red and Blue channels, and Uncheck the Green channel.
![Creation of confetti texture](https://cms-assets.tutsplus.com/uploads/users/1381/posts/26562/image/42%20final%20s-min%20Fin.jpg)
Step 19
Move this new layer, holding Shift, 60 px to the right.
![Creation of confetti texture](https://cms-assets.tutsplus.com/uploads/users/1381/posts/26562/image/43%20final%20s-min.jpg)
Step 20
Create a new layer using Shift-Control-N and Fill it with black. Change the Fill option to 0%.
![](https://cms-assets.tutsplus.com/uploads/users/1381/posts/26562/image/44%20final%20s%2022%2055.jpg)
Step 21
Double Click on the layer and select the Stroke parameter. Use the following settings: Size: 25 px; Position: Inside; Color: Black.
![Creation of tv frame](https://cms-assets.tutsplus.com/uploads/users/1381/posts/26562/image/45%20final%20s%2045%20fin.jpg)
Step 22
Now you need to rasterize the layer style: Right Click > Rasterize Layer Style.
![Creation of tv frame](https://cms-assets.tutsplus.com/uploads/users/1381/posts/26562/image/46%20final%20s.jpg)
Step 23
Go to Filter > Blur > Gaussian Blur and use the following settings: Radius: 4px.
![Creation of tv frame](https://cms-assets.tutsplus.com/uploads/users/1381/posts/26562/image/47%20final%20s-min%20FINAL.jpg)
Step 24
Resize your frame to fill the canvas using Control-T and holding Shift.
![Creation of tv frame](https://cms-assets.tutsplus.com/uploads/users/1381/posts/26562/image/48%20final%20s%20FINAL-min.jpg)
4. Color Corrections
Step 1
Now you will need to create color correction layers to make our image look more “VHS”. Go to Layer > New Adjustment Layer > Curves.
![Creation of curves for VHS color correction](https://cms-assets.tutsplus.com/uploads/users/1381/posts/26562/image/49%20final%20s-min.jpg)
Step 2
Duplicate your curves layer and put it above the first layer.
![Creation of curves for VHS color correction](https://cms-assets.tutsplus.com/uploads/users/1381/posts/26562/image/50%20final%20s%20Final.jpg)
Step 3
Double click on the first curves layer icon and use the following settings:
![Creation of curves for VHS color correction](https://cms-assets.tutsplus.com/uploads/users/1381/posts/26562/image/51%20final%20s%20Funal.jpg)
Step 4
Now Double Click on the curves layer and change the Opacity of the curves to 35%.
![Creation of curves for VHS color correction](https://cms-assets.tutsplus.com/uploads/users/1381/posts/26562/image/52%20final%20s%202121s-min%20Funal.jpg)
Step 5
Double click on the second curves layer and select the standard Photoshop preset “Strong Contrast”.
![Creation of curves for VHS color correction](https://cms-assets.tutsplus.com/uploads/users/1381/posts/26562/image/53%20final%20ss%20Funal.jpg)
Awesome Work, You’re Now Done!
In this simple way, we can create VHS-style glitch artworks from any photo using only standard Photoshop tools.
![Final product image VHS effect Photoshop](https://cms-assets.tutsplus.com/uploads/users/1381/posts/26562/image/FINAL%20IMAGE-min.jpg)
![](https://thephotographicangle.com/wp-content/uploads/2023/10/image-12.png)
![](https://thephotographicangle.com/wp-content/uploads/2023/10/image-9.png)