How to Create a Photo to Pencil Drawing Effect in Photoshop

What You’ll Be Creating
In this tutorial, you will learn how to create an amazing photo drawing effect in Adobe Photoshop. I will explain everything in so much detail that anyone can create it, even those who have just opened Photoshop for the first time.
What You’ll Need
To recreate the design above, you will need the following resources:
- Stock Image
- Texture 1
- Texture 2
1. Let’s Get Started
First, open the photo that you want to work with. To open your photo, go to File > Open, choose your photo, and click Open. Now, before we get started, just check a couple of things:
- Your photo should be in RGB Color mode, 8 Bits/Channel. To check this, go to Image > Mode.
- For best results, your photo size should be 2000–3000 px wide/high. To check this, go to Image > Image Size.
- Your photo should be the Background layer. If it is not, go to Layer > New > Background from Layer.

2. How to Create the Background
Step 1
In this section, we are going to create the background. Go to Layer > New Fill Layer > Solid Color to create a new solid color fill layer, name it Background color, and choose the color #e5e5e5 as shown below:

Step 2
Now go to File > Place Embedded, select the texture from the first texture link, and click Place. Then, set the Width and Height of the texture to 101.73% and name this layer Background Texture.

Step 3
Go to Layer > New Adjustment Layer > Black & White to create a new black & white adjustment layer and name it BT_Desaturate.

Step 4
Now press Control-Alt-G on your keyboard to create a clipping mask. Then, select the Background Texture layer and change the Opacity of this layer to 20%.

3. How to Create the Sketch
Step 1
In this section, we are going to create the sketch. Select the Background layer and press Control-J on your keyboard to duplicate this layer. Then, go to Image > Adjustments > Shadows/Highlights and set the Shadows Amount to 10% and Highlights Amount to 10%.

Step 2
Now name this layer Base and press Control-J on your keyboard to duplicate this layer. Then, drag this layer to the top of the layers in the Layers panel.

Step 3
Go to Filter > Filter Gallery > Artistic > Cutout and set the Number of Levels to 8, Edge Simplicity to 10 and Edge Fidelity to 1.

Step 4
Now press Control-Shift-U on your keyboard to desaturate this layer. Then, go to Filter > Stylize > Find Edges.

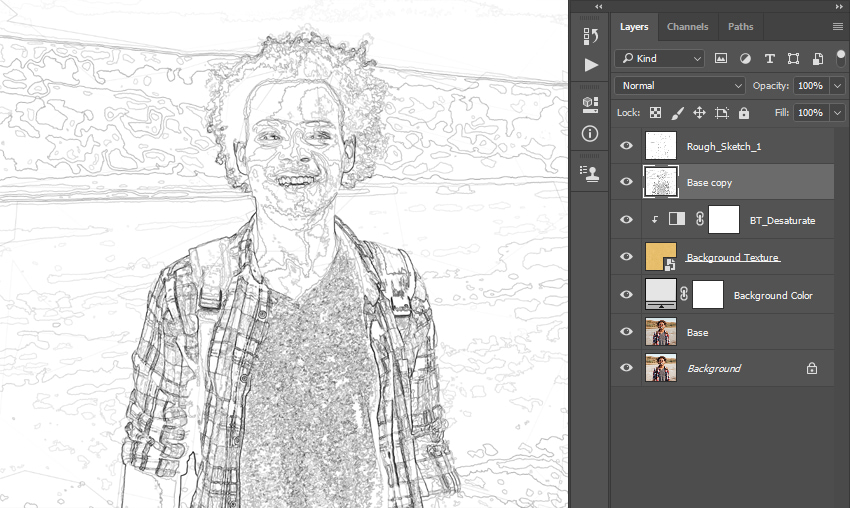
Step 5
Change the Blending Mode of this layer to Multiply and set the Opacity to 20%. Then, name this layer Rough_Sketch_1.

Step 6
Select the Base layer and press Control-J on your keyboard to duplicate this layer. Then, drag this layer just below the Rough_Sketch_1 layer in the Layers panel.

Step 7
Now go to Filter > Filter Gallery > Artistic > Cutout and set the Number of Levels to 8, Edge Simplicity to 2, and Edge Fidelity to 1.

Step 8
Now press Control-Shift-U on your keyboard to desaturate this layer. Then, go to Filter > Stylize > Find Edges.
Step 9
Change the Blending Mode of this layer to Multiply and set the Opacity to 10%. Then, name this layer Rough_Sketch_2.

Step 10
Now Control-click on the Rough_Sketch_1 layer to select both layers at the same time. Then, go to Layer > New > Group from Layers to create a new group from selected layers and name it Rough Sketch.

Step 11
Change the Opacity of this layer group to 80%.

Step 12
Select the Base layer and press Control-J on your keyboard to duplicate this layer. Then, drag this layer just above the Rough Sketch layer group in the Layers panel.

Step 13
Now go to Filter > Filter Gallery > Sketch > Graphic Pen and set the Stroke Length to 15, Light/Dark Balance to 10, and Stroke Direction to Right Diagonal.

Step 14
Change the Blending Mode of this layer to Multiply and set the Opacity to 10%. Then, name this layer Shading_1.

Step 15
Now select the Base layer and press Control-J on your keyboard to duplicate this layer. Then, drag this layer just below the Shading_1 layer in the Layers panel.

Step 16
Now go to Filter > Filter Gallery > Sketch > Charcoal and set the Charcoal Thickness to 1, Detail to 5, and Light/Dark Balance to 10.

Step 17
Change the Blending Mode of this layer to Multiply and set the Opacity to 80%. Then, name this layer Shading_2.

Step 18
Now select the Base layer and press Control-J on your keyboard to duplicate this layer. Then, drag this layer just above the Shading_1 layer in the Layers panel.

Step 19
Now go to Filter > Filter Gallery > Sketch > Photocopy and set the Detail to 2 and Darkness to 5.

Step 20
Change the Blending Mode of this layer to Multiply and set the Opacity to 60%. Then, name this layer Main Sketch.

4. How to Create the Foreground Texture
Step 1
In this section, we are going to create the foreground texture. Go to File > Place Embedded, select the texture from the second texture link, and click Place. Then, set the Width and Height of the texture to 235% and name this layer Foreground Texture.

Step 2
Now Right-click on this layer and choose Edit Contents. In the new file that will show up, go to Image > Auto Tone. Then, press Control-Shift-U on your keyboard to desaturate this layer.

Step 3
Press Control-S on your keyboard to save the changes you have made and close this file.

Step 4
Now change the Blending Mode of this layer to Soft Light.

5. How to Make the Final Adjustments
Step 1
In this section, we are going to make the final adjustments to the design. Go to Layer > New Adjustment Layer > Photo Filter to create a new photo filter adjustment layer and name it Photo Tint.

Step 2
Now Double-click on this layer thumbnail and, in the Properties panel, set the Filter to Cooling Filter (80) and Density to 11% as shown below:

Step 3
Press D on your keyboard to reset the swatches. Then, go to Layer > New Adjustment Layer > Gradient Map to create a new gradient map adjustment layer and name it Overall Contrast.

Step 4
Now change the Blending Mode of this layer to Luminosity and set the Opacity to 12%.

Step 5
Now go to Layer > New Adjustment Layer > Vibrance to create a new vibrance adjustment layer and name it Overall Vibrance/Saturation.

Step 6
Double-click on this layer thumbnail and, in the Properties panel, set the Vibrance to +40 and Saturation to +20.

Step 7
Press Control-Alt-Shift-E on your keyboard to make a screenshot, and then press Control-Shift-U to desaturate this layer. Then, go to Filter > Other > High Pass and set the Radius to 2 px.

Step 8
Now change the Blending Mode of this layer to Overlay and name it Overall Sharpening.

You Made It!
Congratulations, you have succeeded! Here is our final result:


You May Also Like

How to Make a Sandstorm Photoshop Action (Special Effect)

How to Create a Fog Effect Photoshop Action
